A few months before the movie was set to release in theaters, my friend came to me with an idea of making Belle's peasant dress from the new movie, I REALLY wanted to make it happen for her. I've never really made a costume for anyone else, and I was so excited to take on the challenge. I immediately tried to gather as many pictures from the movie as I could, I wanted to make it as screen accurate as possible. While Sarah (my friend), started searching for the perfect fabrics, I took on the search for patterns.
Patterns
I took a look onto burdastyle.com , one of my favorite resources for patterns due to their low prices and instant downloads! I felt like I hit the gold mine when I found their vast collection of dirndl dresses. I sent a few different links to Sarah, and she ultimately decided on this one , which was a great choice. I was able to print it out and start looking at what I needed to change within the pattern to get the results we wanted.
First, I knew that the front bodice seams needed some re-adjusting. The middle piece was too narrow, I wanted the seam to lay a little further out, right next to the straps.
| This very middle seam is a bit too narrow for the look we wanted, so I extended it right next to the strap. |
Not much of a change, but it really helped with accuracy! Also, if you look at Emma's dress, it is clear that she has an extra "flap" of fabric that is sewn into the front right seam, wrapped around to the other side. For this, I traced the section of the bodice pattern pieces that would be covered by the extra flap, with tracing pattern paper. I added a seam allowance all around this new piece for the reason that I would use two layers of fabric. I also had to make a new piece for the part that the flap would attach to. I traced the back half of the side front piece, again adding seam allowance due to double layers of fabric that would be used. Ultimately, this piece would be sewn into the left side seam.
| Left side front piece |
As you may notice, I did not use the dirndl's sleeves, or the part that peeks out above the bodice. I used a separate pattern, also from Burdastyle, of a drapey, thin shirt. You can find the pattern here. This shirt is pretty simple to assemble, as there are no notions, interfacing, or closures to be installed. The sleeves lay just above the wrist, and the neck is a little draped.
For the towel strap, i made blue bias binding out of the same fabric as the bodice and skirt, and sewed the two towels into it, folded over the ends, and stitched a line all the way down.
Fabrics
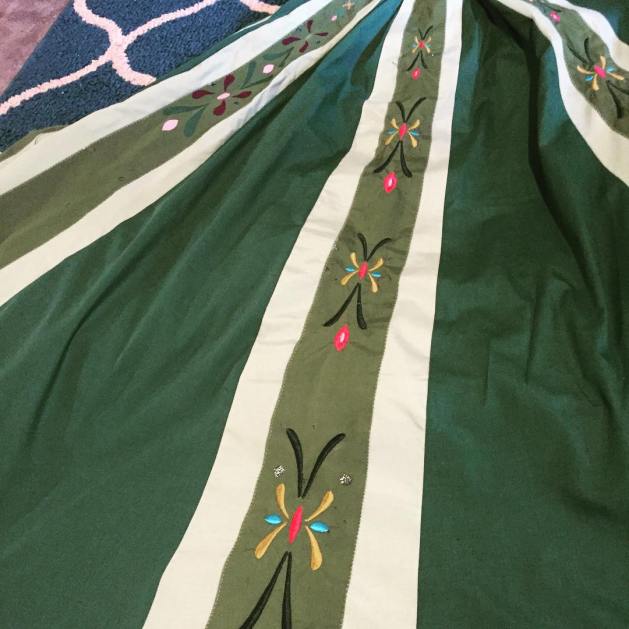
Sarah did all of the shopping for the fabrics, the main color is a medium blue cotton or cotton blend fabric. The middle of the bodice is a red floral calico cotton or cotton blend fabric. the extra flap on the front of the bodice was made out of a terry cloth-like fabric that I had in my stash. The apron was a dark blue and white plaid cotton fabric. For the shirt we used some old curtains that were white and very sheer, Sarah had these leftover and it truly worked so well!
Notions
Interfacing for the whole inside of the bodice (I pieced together used dryer sheets because I'm thrifty like that)
7-9" invisible zipper dark blue (skirt)
7-9" separating zipper dark blue (bodice)
Fourteen 5/32" Eyelets (Get the tool kit if you don't have the tool already)- bodice
Red and white yarn (bodice)
Blue thread
White thread
Two towels similar to Belle's
Construction
Bodice
Once I had the pattern pieces figured out I was able to begin the construction of the dress. I used the new pattern pieces to cut out my fabric. Before sewing up the bodice, I placed the flap fabric right sides facing, sewed at the 5/8 seam allowance that I added, trimmed the allowance, and turned it right side out. I ironed the flap and then top stitched all around at 1/2". I did the same thing with the attachment flap piece. Both pieces were then sandwiched into their corresponding seams on the bodice, pinned, and then sewn together. I followed the rest of the directions on the pattern as they were. When attaching the lining I was sure not to catch the extra flaps that I added. I also skipped sewing the straps together since I will be adding eyelets and lacing through them.
Skirt
The original pattern builds the outfit as a connected dress, instead of doing that I made the skirt separate from the top. To do this, I simply added a typical waist band to the skirt, still keeping the original slit for the zipper.
Other than these changes, I followed the patterns as written.
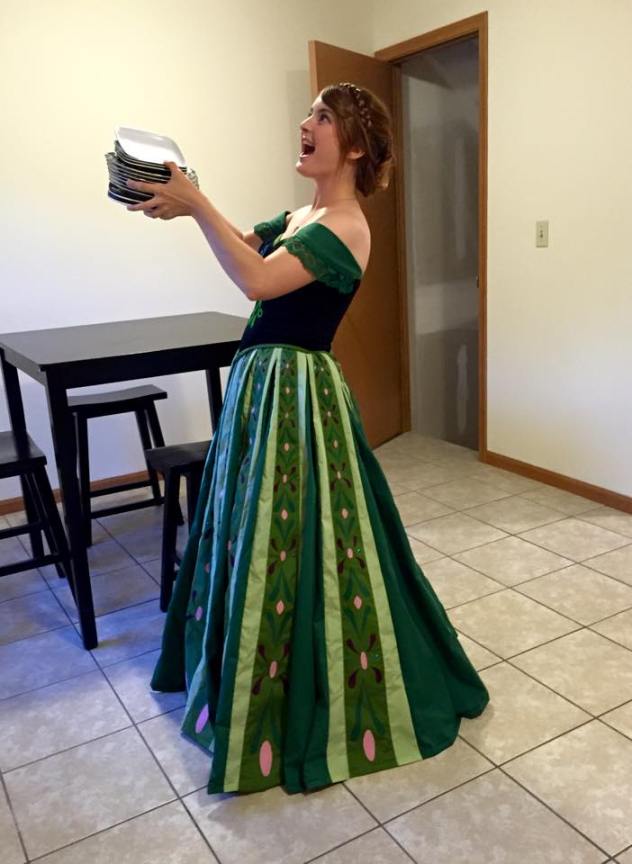
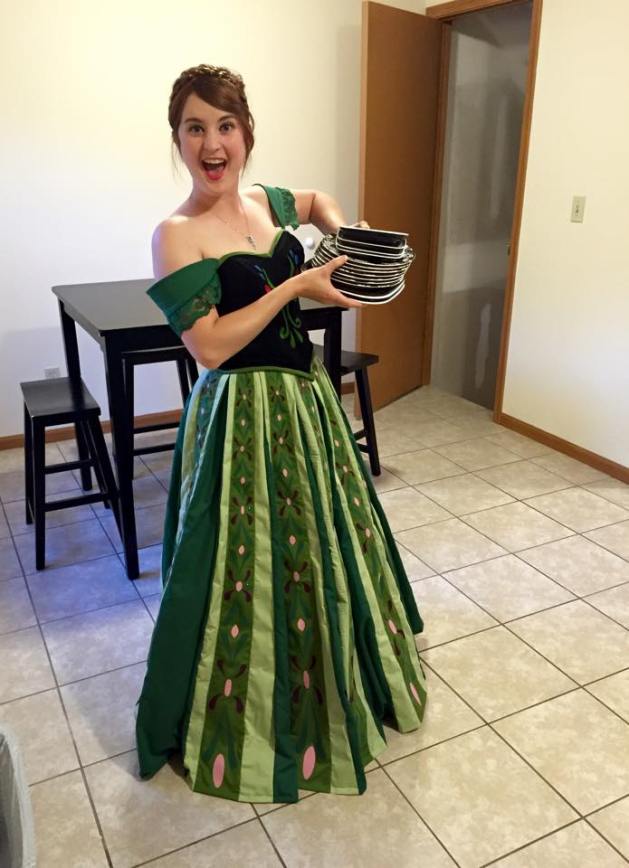
Here are a few pictures of the finished product with the princess herself!


For the towel strap, i made blue bias binding out of the same fabric as the bodice and skirt, and sewed the two towels into it, folded over the ends, and stitched a line all the way down.
Fabrics
Sarah did all of the shopping for the fabrics, the main color is a medium blue cotton or cotton blend fabric. The middle of the bodice is a red floral calico cotton or cotton blend fabric. the extra flap on the front of the bodice was made out of a terry cloth-like fabric that I had in my stash. The apron was a dark blue and white plaid cotton fabric. For the shirt we used some old curtains that were white and very sheer, Sarah had these leftover and it truly worked so well!
Notions
Interfacing for the whole inside of the bodice (I pieced together used dryer sheets because I'm thrifty like that)
7-9" invisible zipper dark blue (skirt)
7-9" separating zipper dark blue (bodice)
Fourteen 5/32" Eyelets (Get the tool kit if you don't have the tool already)- bodice
Red and white yarn (bodice)
Blue thread
White thread
Two towels similar to Belle's
Construction
Bodice
Once I had the pattern pieces figured out I was able to begin the construction of the dress. I used the new pattern pieces to cut out my fabric. Before sewing up the bodice, I placed the flap fabric right sides facing, sewed at the 5/8 seam allowance that I added, trimmed the allowance, and turned it right side out. I ironed the flap and then top stitched all around at 1/2". I did the same thing with the attachment flap piece. Both pieces were then sandwiched into their corresponding seams on the bodice, pinned, and then sewn together. I followed the rest of the directions on the pattern as they were. When attaching the lining I was sure not to catch the extra flaps that I added. I also skipped sewing the straps together since I will be adding eyelets and lacing through them.
Skirt
The original pattern builds the outfit as a connected dress, instead of doing that I made the skirt separate from the top. To do this, I simply added a typical waist band to the skirt, still keeping the original slit for the zipper.
Other than these changes, I followed the patterns as written.
Here are a few pictures of the finished product with the princess herself!