Saturday, March 4, 2017

Princess Anna Coronation Dress Cosplay


11101868_10206614088773304_122055432982173855_n
Finished product with iron-on designs
From the first moment I saw this dress on the big screen, I knew I had to make it! It is so unlike any other princess dress I’ve seen, with all the details and box pleats and just EVERYTHING!! The problem was, I had absolutely no idea where to begin, or how to construct this dress. I put off the project for a long time until I came across the adult Frozen costume pattern by Simplicity. Unlike the Simplicity Pattern for Anna’s travel dress, this one is constructed in separate pieces and is much more authentic! I loved having everything I needed in one package!

Bodice

Following the pattern, I constructed the bodice with black velvet, black lining, boning, and green bias binding (I made myself) for the trim. I used a matching green cotton and decorative lace for the sleeves. I made this dress before I had a machine that could embroider images larger the 4″ so I hand embroidered the design on the bodice. Although, the result is awesome, I accidentally used the concept art bodice design rather than the screen version. OH WELL!

Skirt

Following the pattern, I constructed the skirt with three different colors of green cotton. From what I can remember, this skirt took a while to make, but wasn’t too complicated. Once it was fully completed, I started working on the designs. WOW, this took so much patience and time. I followed the pattern’s technique of tracing the designs onto paper backed fusible webbing, ironed the webbing onto the fabric, used an Xacto knife to cut out the designs from the fabric, then strategically ironed the pieces onto the skirt. The designs looked pretty good, but after a while some of them began to fall off. Later on, once I bought a machine that could embroider larger designs, I took off the iron on pieces and embroidered with the design I bought from this etsy shop. It looks so much better!! 😀
I was also having trouble with the pleats gaping open and just not sitting right, so I used a zigzag stitch going all they way down each side of the decorated panel, onto the inside panel.

Shoes

The easiest part! I bought some black flats at Wal-mart and used gold bias binding around the opening of the shoe. The first time I painted on the design, but once I got my embroidery machine, I embroidered the design onto black fabric and glued it onto the shoes.

Necklace and Hair clip

I bought these from fellow artisans at these etsy stores!
Necklace: fandomrevolution
Hair clip: aishavoya
11256839_10206626155634968_9125637130824771368_n
We had a little less than 8,000 salad plates
11088343_10206626155954976_5744398382964162709_n


11722184_10207182233096557_5739067127114545002_o
Embroidery! (Never got a pic of me wearing it)
PHOTO SHOOT TO COME!

Princess Anna Travel Dress Cosplay (Second Attempt)

img_0719


So, now I will walk you through my second attempt at making my Princess Anna travel dress cosplay. One day I looked at what I had made and just decided that it wasn’t good enough and that I could do better (I feel strongly about Anna). I started my research all over, trying to find good reference photos, advice and notes from other cosplayers, and taking my time. I had no deadline to meet this time so I promised myself not to rush through it.
You can view my first attempt here.
Originally, I had bought the new pattern from Simplicity of the adult frozen costumes. At first glance I was really excited to have everything in one package, but taking a closer look, I realized that the costume was constructed as one piece. I had started making the dress using this pattern, but then my boyfriend convinced me that it would probably be too costumey. I really wanted an authentic and professional look, so I opted to find separate patterns that would work.
During my search, i found a fantastic blog of a woman who makes some amazing costumes! Tracy’s Costuming World her construction notes helped me so much, and I used a lot of the patterns that she suggested.

Bodice

I pretty much followed Tracy’s advice on the bodice. I used the Simplicity 2851 pattern, but altered it just as she did to create a sweet heart neckline and squaring the angels in the back. I used a velvet black fabric and black lining fabric, but no coutil. I sewed channels in the liner for the boning. I also used ready made gold bias binding for the gold trim. At the time, I absolutely loved having a zipper in the back instead of lacing it up. Although, the bodice has become looser from wear, or losing weight, so I took out the zipper and added eyelets with my sewing machine and used a shoe lace as the lace, for a tighter fit.

Blouse

I used a light blue cotton fabric and found a pattern with a mandarin collar, here. I did my best to follow Tracy’s velcro closure technique, but mine ended up not being very functional. It would pull strangely and pucker where you could see the velcro. Later on, I ended up adding buttons, which made the blouse a lot more functional. If I were to remake the shirt, I would use a stretchy cotton fabric. I also added the embroidered details this time around, just as Tracy did.

Skirt

For this part, I took on my own search to patterns to find one with the pleats that Anna’s skirt has. My boyfriend, Aaron, found this pattern. It is so close to what I needed! All I had to do was lengthen it a bit.
I needed a way to achieve the scalloped edge with the two different colors of blue. I used a cotton fabric (I learned my lesson last time), so I had to find a way to create the the scalloped edge and be able to finish it so that it wouldn’t fray. I went back to the frozen pattern from simplicity and used their pattern piece and technique for the scalloped edge.

Hat

This time, for the hat, I used the Frozen pattern from Simplicity. I don’t think that its really accurate, but it looks cute and functions way better than the last one. It has ribbon that ties around your chin so it stays on!

Mittens

I don’t remember the exact pattern I used, but I just google searched for a free mittens sewing pattern and used light blue fleece.

Cape

I kept my old cape that I made from the McCalls Frozen Pattern, but I took out the old pom poms I had in there and put dark purple ones in. I also added the decorative trim with felt, just like Tracy.

Embroidery

One of the biggest reasons I decided to re-make this cosplay was because I purchased a sewing machine that can embroider much bigger designs! I found and purchased almost all of the designs at this etsy store! I couldn’t find an embroidery design for the hat, so I just did that by hand.

Boots

I used the same boots, but painted over the yellow with black. I embroidered the boot design onto black fabric, cut the designs out and hot glued them to the boots.


To sum it all up, I am very happy with the outcome of my new and improved Princess Anna cosplay. The only thing I’m trying to decide now is if I should buy a wig for it!
12186802_10203526782410372_7216991685802739163_o
15731931_10211326539861636_8172112427796823913_o
11987155_10207526996915437_381167338721009211_n
11988755_10207526996715432_5990693865073363324_n
img_0720


PHOTO SHOOT COMING SOON!!

Friday, March 3, 2017

Princess Anna Travel Dress Cosplay (First attempt)

anna_render2
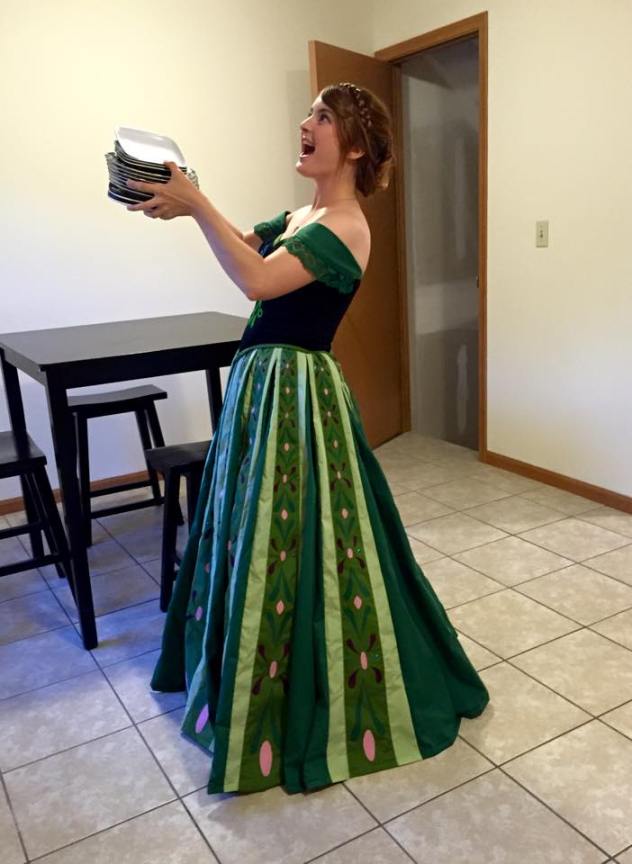
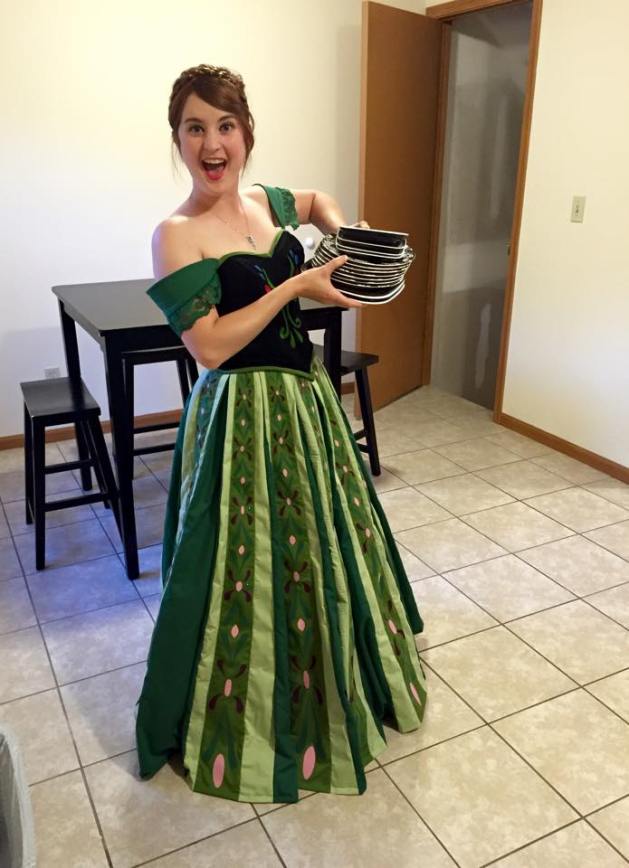
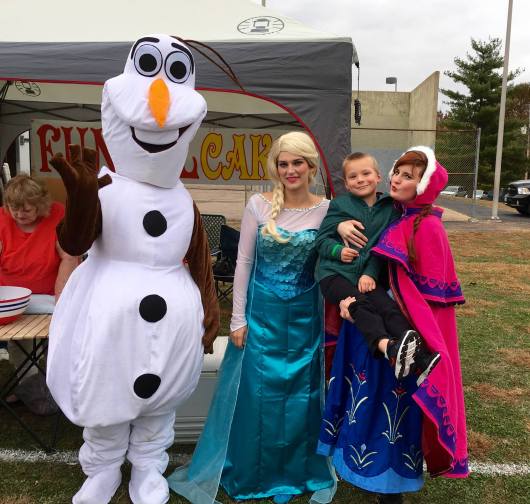
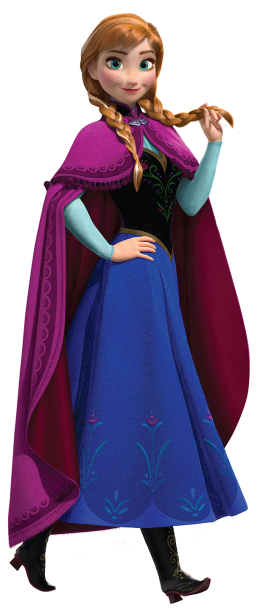
I believe I would consider this costume my first legitimate cosplay! I’ve re-created and added to this cosplay many times, just trying to make it as perfect as I could. Like many others, I fell in love with Frozen, particularly Princess Anna. She is the first princess that I have connected so deeply with since Ariel! For me, that’s saying a lot, Ariel is mah gurrrll.
My very first go-around with this costume was back in the spring of 2014, my plan was to be Anna for Halloween. I unknowingly plunged into an extremely detailed and tedious project that would take a very long time to complete. Although, this first attempt was not very accurate, I was extremely satisfied with it at the time. Other than using it for Halloween events of the year, I started doing Frozen birthday parties with my sister and my friends, Sarah and Linda! It was a very neat and fulfilling experience that I wish I still had time for. I’ll never forget all the happy little faces that lit up when they saw Elsa and Anna walk through their doors.
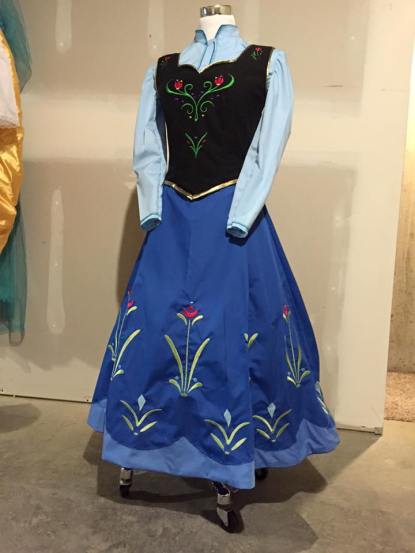
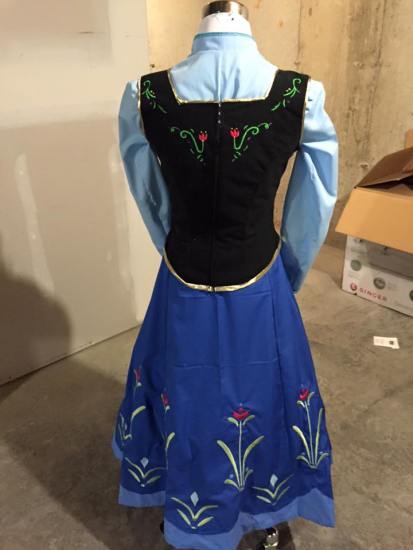
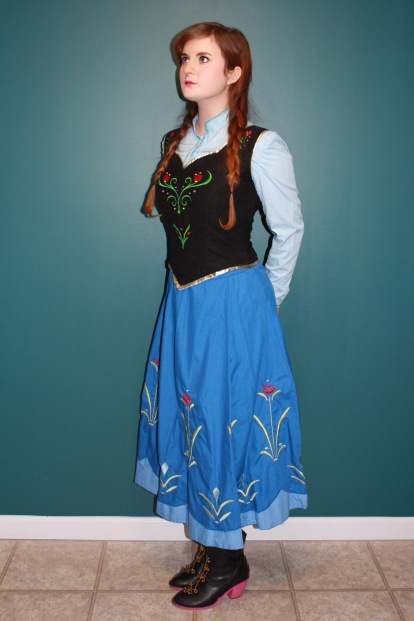
I used various different patterns for this first attempt at the travel dress. For the bodice, I used Butterick B5935. I believe would be a great choice for anyone to use, IF they were to alter the pattern to have a sweetheart neckline, a solid shoulder strap and a more prevalent point at the bottom. Sadly, I did not think of doing this! TIP: Do not use ribbon for the lace in the back, use a shoe lace!
For the skirt, I used a full circle skirt pattern like 
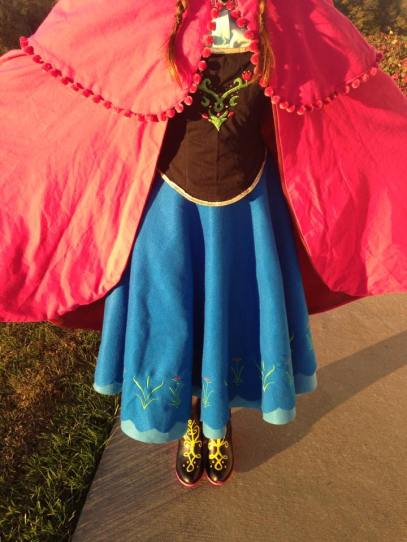
this. I used two layers of felt in two different blues. I thought this would be a great idea since I needed a scalloped edge and felt doesn’t fray! Some issues I ended up having with this skirt was that it was really really hot due to two layers of felt, FAIL! The thickness of the felt also added bulk, which gave the illusion that my bottom half was a lot bigger than it actually is… I SWEAR IT WAS THE FELT! Another issue was that it did not have the pleats that Anna’s skirt does.
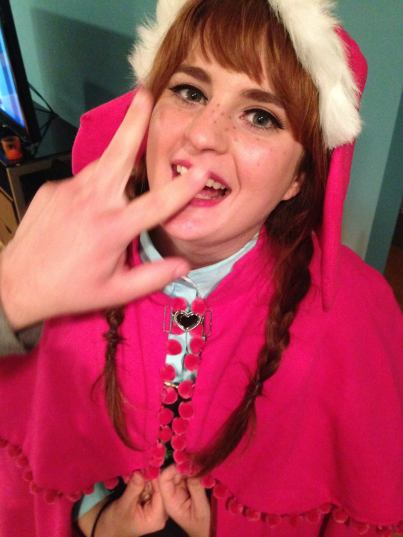
Hat- This was just a mess, I used my own measurements to make my own pattern. It was ok, but the ear flaps wouldn’t lay down to my face, nor would it stay on my head very well.
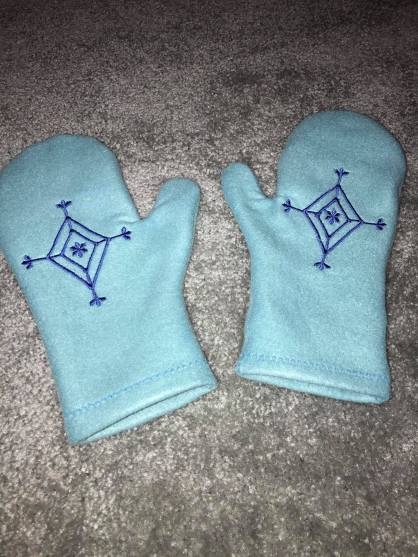
Mittens? Nah, didn’t make them this round.
Blue undershirt-I just bought a light blue button up shirt from Wal-Mart. Again, this was ok, it fit and functioned well, but did not have the accurate, decorative detailing, nor did it have a mandarin collar.
Boots- I simply searched on E-bay for some black boots that were the similar style as Anna’s, something like these. I then used yellow puffy paint to paint on the details on the front and back of the boots. I also used pink acrylic paint for the soles.
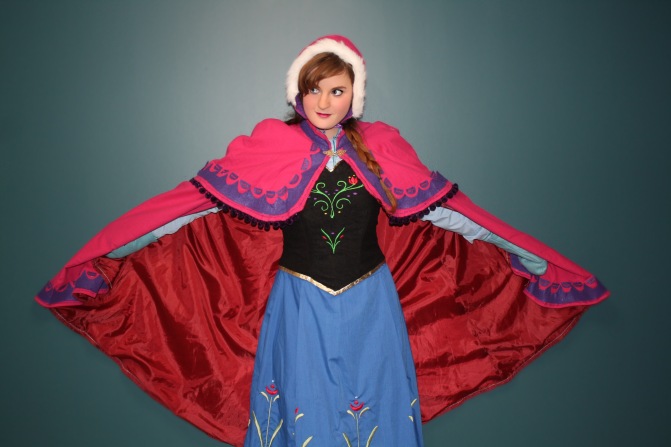
Cape- I used the only Frozen pattern that was available for adults at the time. I think the pattern for the cape is great! I would not change this, and I didn’t! For the first time around I used a fuchsia flannel fabric for the exterior and a much darker fuchsia lining fabric for the lining. It felt solid and authentic, I loved it! For the decorative pom poms that Anna has around the mini cape, I used the same color as the main fabric, which was a mistake. Anna’s pom poms are a dark purple, the purple really makes the cape pop with depth. I also left out the dark purple edging design that is found on Anna’s cape, which was also a mistake. The closure that holds the cape at the neck was not accurate to Anna’s, I simply found a closure at Joann’s, and picked the only one that had a heart.
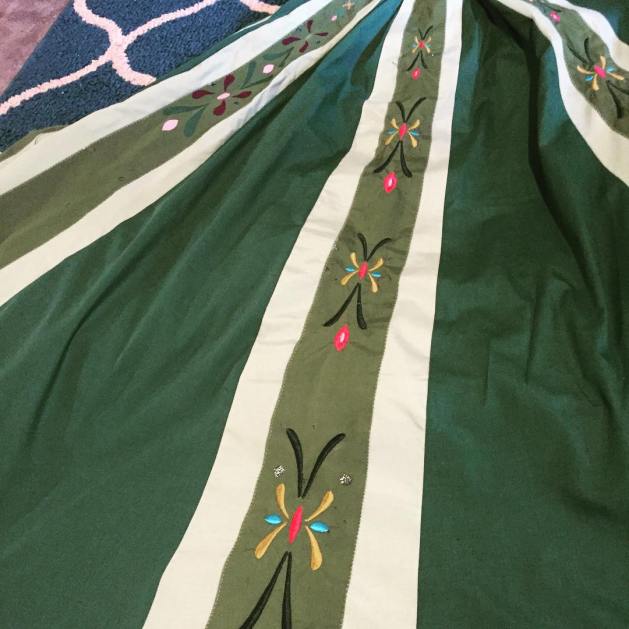
Embroidery- At the time, I didn’t have a machine that would embroider designs that were larger than 4 inches. My only option was to hand embroider each design onto the bodice and skirt. This took FOREVER, just as you would think. I drew on the designs by hand, and then embroidered over the design. My designs were a bit inconsistent, and too small. I realized this halfway through and just didn’t have the patience to start over.
Overall, this project really helped me learn a lot! The mistakes that I made, made me realize to do my best the first time rather than glazing over things, or leaving details out. Details are SO IMPORTANT! Research, and gather as many reference photos as possible, so you don’t miss something.
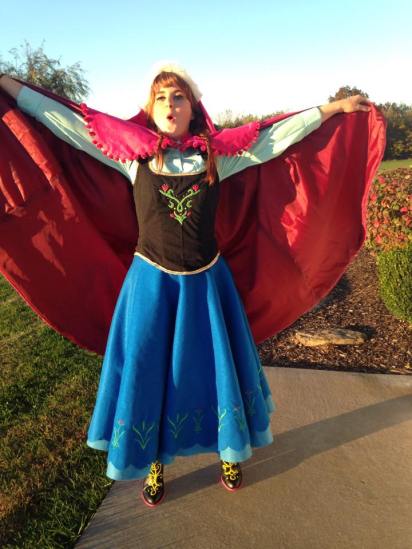
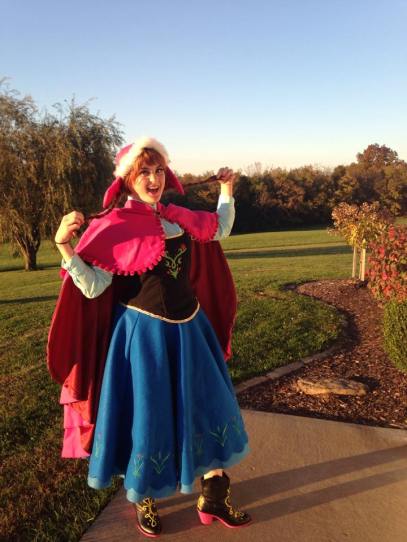
The finished product of the first attempt:
10633256_10202839435569409_8529933961069066462_o
See what I mean about the hat?
1920263_10202835255144901_4088624836903370654_n

The cape seems flat and boring without the details
10476385_10202835264865144_1989214853523196565_n
HAHA!
10448215_10202835266105175_5391315085899991249_n
THAT BULK!
I will be posting my update Princess Anna travel dress cosplay very soon!
Photos taken by my good friend, Sarah!

First Blog Post

Hello, I’m Dalyn. I never know what to write in the very first posts of new blogs, so I’ll keep it short. I have many passions which include: sewing, crocheting and cosplaying. The main reason I started this blog was to document and share my creations with the world, and hopefully promote my Etsy store. I hope to connect to other cosplayers and provide any help I can!